Arugula Pizza

Arugula Pizza

I’m not the first to say it, but Arugula is the New Basil. Ryan and I aren’t shy about our affection for a good pizza. In fact, we fell head over heels in love with Apizza Scholls in Portland and we celebrated the news of our first pregnancy at Home Slice in Austin. Whenever we visit a new town, we make sure to try out the city’s best offering.

Back home, we make pizza at least once a month (and more often, once a week). Homemade dough, a sweet and spicy tomato sauce, and mozzarella cheese make for a delicious and easy weeknight meal. I’ve always loved adding fragrant basil to my piping hot pizza, but as you mighty know, the vibrant green leaves quickly turn dark black once met by heat. And although the pizza still tastes good…it looks a little disappointing.

Arugula Pizza

And if I believe anything about food its this: food should be appreciated by all five senses.

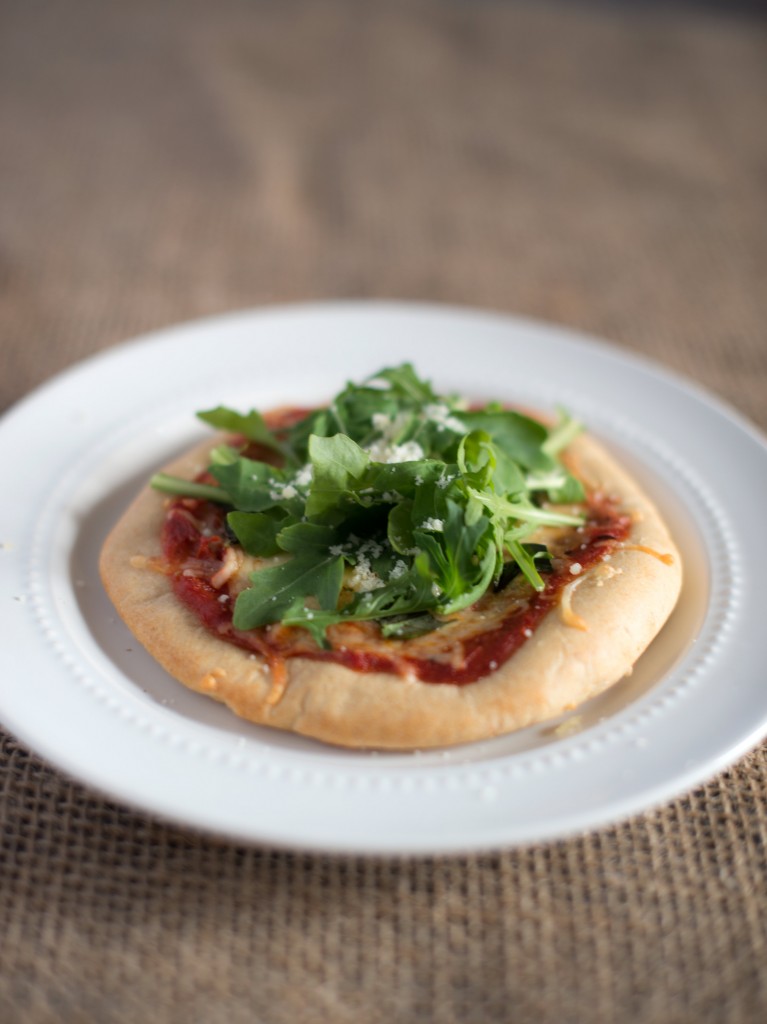
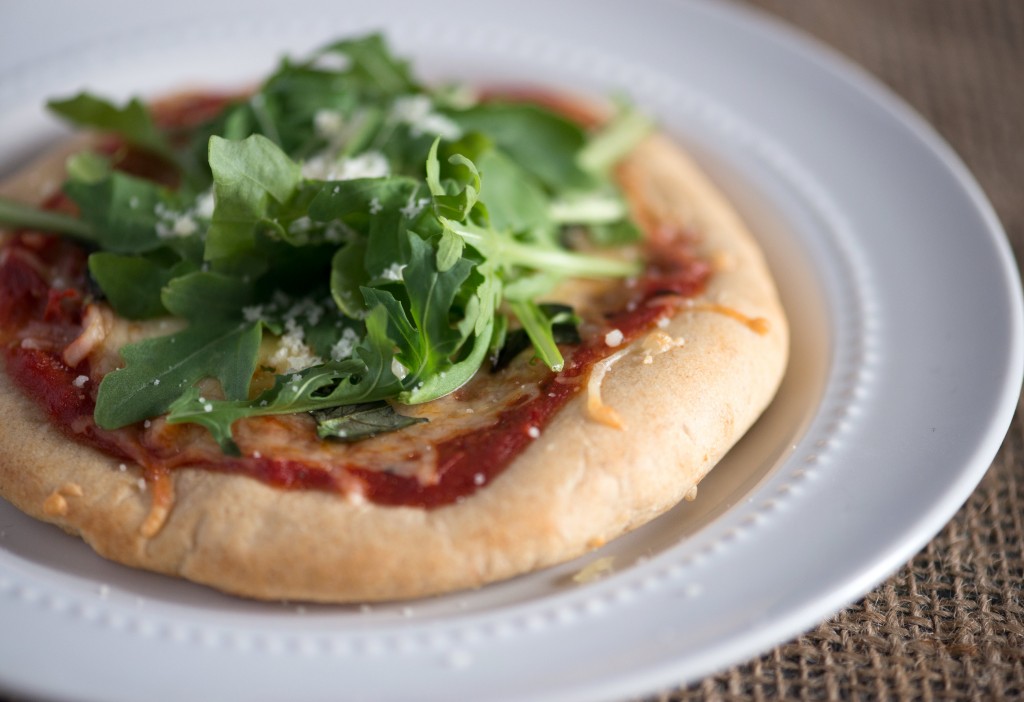
So enter arugula. Spicy, flavorful, and shockingly resistant to melting pizza cheese, arugula is now my greenery of choice. I throw it on my pizza for the nutrition, for the taste, and for the visual appeal. It transforms an ordinary cheese pizza into the belle of the ball.

Arugula Pizza

Arugula Pizza

4 Whole Wheat Pitas

8 ounces mozzarella cheese, finely shredded

1/2-3/4 cup prepared tomato sauce

8 ounces organic arugula, washed

Preheat oven to 400 degrees fahrenheit. Line two small baking sheets or one large baking sheet with parchment paper. Arrange pitas two inches apart. Generously spoon tomato sauce on pita bread and sprinkle with mozzarella cheese. Bake in preheated oven for 10-15 minutes, or until cheese is melted and beginning to turn golden brown. Remove from oven and sprinkle arugula on top. Serve with a glass of wine and Parmesan cheese.

Chewy Snickerdoodles

Chewy Snickerdoodles

We live behind a neighborhood elementary school. In a few days, our street will clog with parents and eager students; we’ll begin to hear the excited shrieks that accompany afternoon play. I’ll open up my back door to watch the kindergardeners interact in what will be the first of many social playgrounds. I’ll remind it won’t be long before Lucy joins them.

Growing up, I looked forward to the occasional sweet treat in my lunchbox. On most days, my mom wisely sent us to school with fresh fruit, but occasionally we’d find a cookie or a blondie. A special treat that brightened up my seven-year-old self. Unlike most children, I didn’t find much appeal in chocolate. I’d always take a slice of apple pie, a sugar cookie, or a date bar over a brownie or a chocolate chip cookie. And so my mom often packed treats laced with cinnamon…and I so fell hard and early for the ubiquitous baking spice.

Chewy Snickerdoodle

When I think about the perfect back to school treat, these snickerdoodles easily come to mind. They’re a classic cookie–soft, chewy, and simple–and they hint to fall with their heavy helping of cinnamon. I’ve tried many snickerdoodle recipes over the years, but this is my favorite. These cookies bake up well in the oven, lending to big and beautiful cracks in the otherwise cinnamon coated surface. They won’t grow hard after they cool, and you’ll find they’ll keep well for several days.

So if you have a little one returning to school soon, make these cookies. And even if you don’t…they’re well worth an afternoon.

Chewy Snickerdoodle

Chewy Snickerdoodles

1 3/4 cup sugar, divided

1 tablespoon roasted cinnamon

2 1/2 cups all-purpose flour

2 teaspoons cream of tarter

1 teaspoon baking soda

1/2 teaspoon salt

1/2 cup unsalted butter

1/2 cup vegetable shortening

2 large eggs

Preheat oven to 375 degrees Fahrenheit. Line two baking sheets with parchment paper. In a shallow bowl, whisk together 1/4 cup sugar and cinnamon. Set aside. In a medium bowl, whisk together flour, cream of tarter, baking soda and salt.

In the bowl of your stand mixer, beat butter, shortening, and remaining 1 1/2 cups sugar on medium speed until light and fluffy. Add in eggs, one at a time, mixing until incorporated. Reduce mixer to low and slowly add flour mixture until combined.

Working with two tablespoons of dough, roll into ball. Then roll ball in cinnamon sugar mixture to coat and set on prepared baking sheets. Repeat and space balls two inches apart.

Bake cookies one sheet at a time until the edges are just set but the centers are still soft and puffy, about ten minutes. The cookies will look almost raw. Allow cookies to cool on baking sheet for ten minutes, then transfer to write rack. Makes about 2 dozen cookies.

Slow Baked Salmon and Spinach CousCous Salad

Slow Baked Salmon and Spinach Couscous Salad

We returned home from West Virginia late Monday night. It was a good trip. One of those trips you almost wish was a little less good…because then it wouldn’t hurt so much to say goodbye. My little sister and I are four years apart, and we’re now over one thousand miles away from each other. She’s one of the brightest, most loving and sacrificial people I know. I miss her more than words can convey.

Slow Baked Salmon and Spinach Couscous Salad

And so, as is custom around here, I’m baking and cooking to work through my sadness. There’s nothing quite as comforting to me as a clean kitchen and a refrigerator stocked with fresh produce. Give me a few hours…and I can work through most tangles of emotion.

Happily, these therapy sessions tend to be good for both my heart and my stomach. I’ve made quite a bit of salmon over the last few years, but I’ve finally hit on recipe gold. This salmon is slow baked, which means that my days of overcooking salmon are officially over. You’ll find that this method almost always guarantees an intensely moist and flavorful filet. I couldn’t stop rejoicing as we ate our way through dinner–I finally figured out how to do this!

Slow Baked Salmon and Spinach Couscous Salad

And then this simple couscous salad is packed full of good things: toasted pine nuts, feta cheese, roasted tomatoes, organic spinach….This simple spinach couscous salad was meant to serve at least four, but Ryan and I couldn’t resist going back for seconds and then thirds.

So if you’re finding your emotions running high this week, get into the kitchen and make this meal. Your heart and your stomach will thank you.

Slow Baked Salmon and Spinach Couscous Salad

Slow Baked Salmon

12-ounce fillet of salmon, skin on (or 6 ounces per person)
Finely grated zest of a lemon (1 loosely packed tablespoon)
1 tablespoon of olive oil
A generous pinch of flaky sea salt

Place a pan 1/2 full of water (I use a 8″ round cake tin) in the oven on the lower rack and preheat to 250°F. Lightly grease a baking pan. Place the filet of salmon on baking pan, skin side down. Brush olive oil on top. Sprinkle with sea salt and lemon zest.

Bake for 25 – 30 minutes. Check for doneness at 20 minutes. Place a knife tip in the thickest part of the salmon and gently pry. If the salmon separates into flakes, it’s done. If not, return it to the bake for another five minutes.

Spinach Couscous Salad

One pound organic spinach

Four cups prepared couscous (about 2 cups uncooked)

1/2 cup pine nuts, lightly toasted

1 pint cherry tomatoes tossed in about 1 tablespoon olive oil

1 8 ounce package feta cheese

1/4 cup high quality olive oil

2 tablespoons white wine vinegar

2 tablespoons Dijon mustard

1 tablespoon honey

Preheat oven to 400 degrees Fahrenheit. Spread tomatoes (tossed in olive oil) on a baking sheet. Roast until they just begin to burst, about 20 minutes.

In a large skillet, heat spinach until it starts to wilt. Remove from heat.

In a large bowl, gently toss together roasted tomatoes, wilted spinach, cooked couscous, toasted pine nuts, and feta cheese. In a small bowl, whisk together olive oil, white wine vinegar, Dijon mustard, and honey. Pour over salad, toss again, and serve at room temperature.


In West Virginia

I’m spending time with my sweet sister in Wild and Wonderful West Virginia. Regular posting will resume on Wednesday!

20140803-122301-44581054.jpg

Little One Eats: Homemade Goldfish Crackers

Homemade Goldfish Crackers

MOLARS (also known as Monet’s worst enemy). Friends, we’ve had an exhausting, tear-filled week. Lulu is working on her one-year molars, and the battle’s been a particularly painful one (for her and for me). Last night, she woke up to nurse EIGHT times. I felt like I had tunneled back to newborn days…until I tried to heft her now 21 pound body across my own.

But along with molars, kisses. Yes, Lucy now knows how to kiss, and her sweet lips pressing and smacking against my cheek melt my heart every single time. So we take the good with the bad.

Speaking of good…these homemade goldfish crackers impressed everyone in my household. Even my sweet mom asked me to make her a batch after she tried a few (and my mom is not a big snacker). “You should sell these,” she said.

Homemade Goldfish Crackers

And if I had any spare time, maybe I would! But instead, I’m just going to share them with you. These goldfish crackers taste FAR better than the ones you can buy in the store. Real sharp cheddar cheese, onion powder, garlic powder, and dried herbs. The little ones and the older ones in your life will love them. I’m married to a jeweler, so with his tools it was easy for me to fashion a goldfish cutter out of a cheap and pliable circle fondant cuttter from my cake-decorating days. But really, these crackers taste just as good with or without the iconic shaping.

Homemade Goldfish Crackers

Homemade Goldfish Crackers

1 cup (4 ounces) finely shredded sharp Cheddar cheese

1/2 cup (2 1⁄8 ounces) unbleached all-purpose flour

1/2 cup (2 1⁄8 ounces) cake flour

1 tablespoon Italian seasoning

1 tablespoon cheese powder (this can be found at your local spice store)

1 teaspoon kosher salt

1/2 teaspoon baking powder

1/4 teaspoon onion powder

1/4 teaspoon garlic powder

1/4 cup whole milk

1 tablespoon vegetable oil

Whisk together flours, herbs, salt, baking powder, and onion powder together in a large bowl. Fold in cheese and stir until evenly distributed and coated.

Add the milk and vegetable oil. Stir well and then knead in the bowl with your hands until a cohesive dough forms. It will be crumbly at first, but continue to press and knead the dough.

Preheat the oven to 375˚F. Line two baking sheets with parchment papers.

Divide the dough into two pieces. Roll the dough as thin as possible, no more than 1/8-inch thick. Thin dough leads to crisp crackers. Stamp out cracker shapes with your cookie cutter of choice.

Bake for approximately 15 minutes, until the crackers are crispy and just turning golden at the edges. The timing will vary according to the size of your crackers.Transfer to a wire rack and let cool completely. These crackers will keep well for one week.